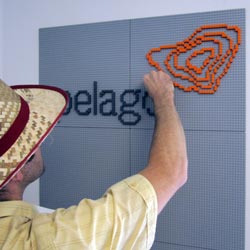
 I grew up with Lego and have yet to find a toy as creative as those versatile, colorful bricks. Not a minute was wasted playing with Lego. And I witnessed the advent and evolution of the gaming console, my favorites being the Atari 2600 and the Nintendo Entertainment System (NES). I wasted a lot of minutes with the NES. Lego and the NES are two of my favorite childhood memories.
In this post…
Today being an era of makers and mashups, I’ve combined Lego and the pixel style imagery of the NES to create 8-bit lego art. In this tutorial, I will show you how to use Photoshop and Lego bricks to create an 8-bit version of your company logo.
1) Pixelate the Image
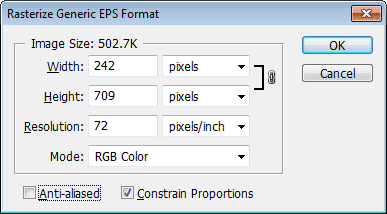 When learning how to make 8-bit art in Photoshop the first step is saving your logo as a vector format, such as EPS or AI. Open the image in Photoshop. When prompted to enter the dimensions of the image, uncheck the box labeled “Anti-aliased.” This will instruct Photoshop not to smooth the edges of the image, leaving them as one color. The goal is to end up with an image that has jaggies. And we want to keep the image dimensions small enough that each square is the equivalent of a 1×1 pixel, with no half-squares or overlapping.
2) Zoom In
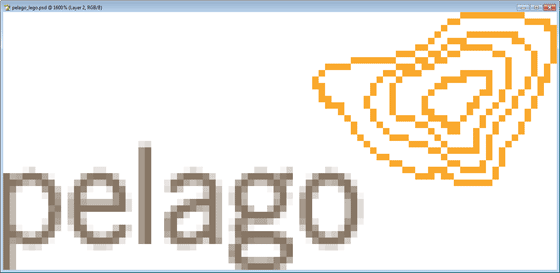
Next, we zoom in to the image. We want to enlarge the display of the image on our screen without enlarging the actual image file. If we were to let Photoshop scale up the image, it would interpolate the pixels and re-introduce the anti-aliasing we removed in step 1. In this example, I’ve enlarged the image 1600% so it fills the screen, which results in each 1×1 pixel being upscaled to 16×16 pixels. We do this to increase the size of each “pixel” for the next step.
Please note, I’ve chosen not to pixelate the type in our logo to give myself more creative room when laying out the type in Lego.
3) Capture, Paste and Crop
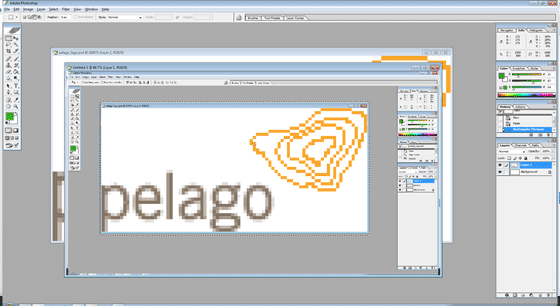
Now that we’ve enlarged the image, need capture this upscaled version saved as an image. First, we take a screenshot. In Windows this is done by pressing Alt+Print Screen. Second, we create a new image in Photoshop. The dimensions will be auto-populated based on the screenshot we just captured. And finally, we crop the image and save it. The resulting image is an upscaled rendering of our logo that will translate perfectly into Lego bricks.
4) Create a Grid
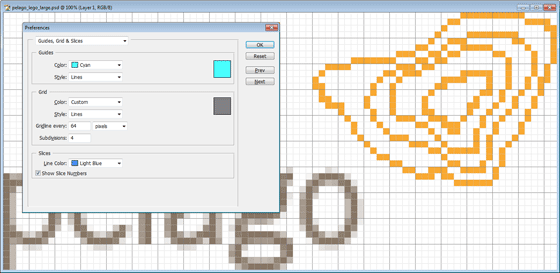
Creating a grid overlay on our logo tells us exactly where the Lego bricks will be placed, and will help us calculate how many bricks to order in the next step. This really helps when building out more complex logos with different colors. First we need to figure out what size our grid should be. We know that each 1×1 pixel was upscaled to 16×16 pixels, so we’ll use the number 16 as a baseline for our grid. Second, go to Edit -> Preferences -> Guides and Grids to setup the new grid. I set my grid to display a gridline every 64 pixels with 4 subdivisions.
5) Order Lego Bricks in Bulk
Taking inventory of the number, size, and color of the Lego bricks needed will require some creative thinking. Using the gridded image as your guide, mark off sections by the type of brick that will be used — 1×1, 1×2, 1×3, 1×4, 2×2, 2×4 bricks are all common sizes likely to be used for your logo. The bricks can be ordered in bulk using Lego’s online Pick a Brick service. You may also want to order a plate, which will serve as your canvas for the 8-bit logo.
6) Build with Lego Bricks
The last step is the most fun. Start pressing the bricks onto the plate in the same way the pixels are arranged on your gridded image. It may take a little while, especially if you take some creative liberties like I did. In the end, you’ve got a great looking piece of Lego art that can be displayed on the wall, given away as a promotional item or gift, or just plain admired on your desk. And this process can be applied to any image you want to reproduce in Lego. I’ve already got plans to make 8-bit Lego art from some of my favorite NES games.
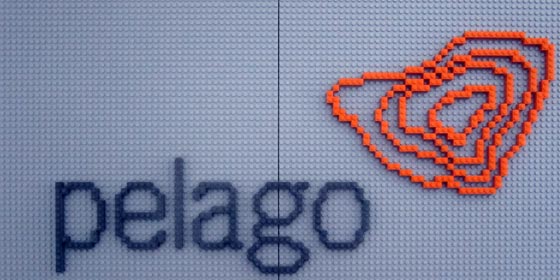
The end result: The Pelago logo rendered in 8-bit fashion using Lego bricks.
that’s sweet :)