It is a common practice for Web designers and developers to accept payment up front for work yet to be specified by the client. Known as a Retainer Agreement, this type of contract is useful for doing repeat work with good-standing clients. The agreement usually specifies that the work to be performed will be deducted from the retainer based on an hourly rate. And because the client is paying up front, in good faith they will receive your best efforts and attention in return, it often helps to include a clause guaranteeing your response time on future work requests.
Looking for a contract to get started signing retainer agreements with your clients? Feel free to use our time & materials contract — specifically designed for prepaid Web design and development projects.
A simple retainer agreement is a great way to help regulate cash flow, a welcome relief to any Web design and development agency or freelancer all too familiar with the month-to-month feast-or-famine nature of doing professional web services. Be careful, however, not to bulk up on retainer agreements, or you may find yourself over-committed to several clients who all need your time at once. Pace yourself.
Most important, keep track of your time on each retainer agreement, especially if you are billing hourly for the work performed. Knowing how much time has been tracked against each project is critical for knowing when to renew existing retainer agreements and/or take on new ones.
Our Web-based time tracking and project management software, Intervals, is perfectly suited for tracking time worked against retainer agreements. The following is a step-by-step guide showing exactly how.
Step 1: Create a project and enter hourly rates

The first step is to set up the project and hourly rates. This project will be used as a container to track overall progress on the retainer agreement. To get started, click on the Projects tab and “Create a new project” link inside your Intervals account. Be sure to enter the budget for the project, which should equal the amount of the retainer, and a percentage for when you would like to be notified. Intervals will notify you when this percentage of the budget is reached, to help you avoid going over budget. Then enter the start and end date of the agreement and save the project.
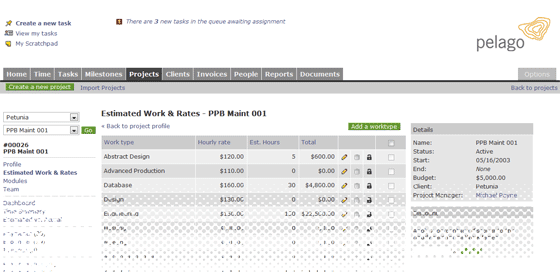
Second, define the hourly rates that have been contractually agreed upon for this project. Click on the edit icon next to each work type and enter the hourly rate specified in the retainer agreement. The hourly rates will be used to calculate how much of the retainer has been spent when tracking time.
Step 2: Add the retainer payment to the project
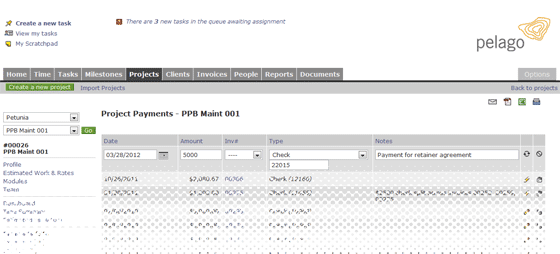
Click on the “Payments” link in the left column of the project profile and enter the amount of payment received from the client. It is also helpful to record the check number and any specific notes about this payment. Adding the payment sets the project balance to the value of the payment, and is used calculate the dollar amount left on the retainer while tracking time billed working on project tasks.
Step 3: Create tasks to track each request from the client
Clients can easily submit work requests by sending an email to request@mycompany.intervalsonline.com (just be sure to replace “mycompany.intervalsonline.com” with your Intervals account Web address. If the client’s email address has not already been entered as a client contact, be sure to whitelist them in your Intervals account email settings.
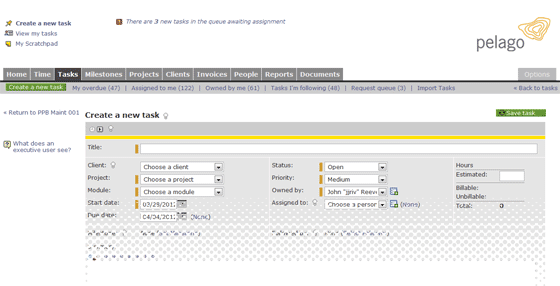
Once the request has been received, simply assign it as a task to get started working on it. Fill out the relevant fields, such as start date, due date, priority, etc, and save it to get started. Now you’ve got a task where you will track the request through to its completion, resulting in a thorough history of work performed and time billed.
Step 4: Track time on each task
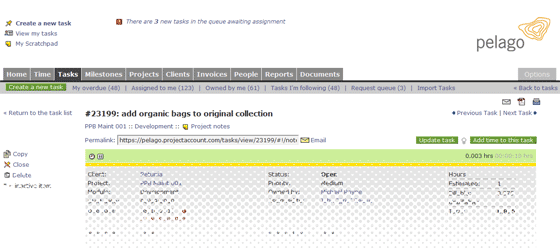
To track time while working on the task, it’s as simple as clicking the start button on the timer in the task header. This will start a timer running, letting Intervals keep track of the time while you focus on completing the task. When taking a break, pause the task timer. When stopping for the day, apply the timer to the task, selecting the hourly rate performed and adding an optional description.
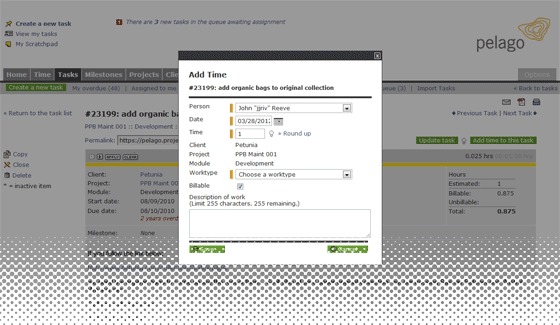
It’s also useful to update the task with notes at each stopping point — a description of work completed to day, a to-do list of what needs to happen next, or a brief update to the client. Once the task has been completed, set its status to “Closed.” Doing this will effectively move the task to the background so you can continue to focus on current tasks. The time you’ve tracked against the task will appear on the project dashboard and reports, which both can be used to update the client on the balance of their retainer agreement and work performed to date.
Step 5: View the project dashboard for status updates

The project dashboard will give you a rundown of how many tasks have been assigned for this retainer agreement and where they stand; it will show how many tasks are closed, open, under client review, etc. The dashboard will also show you the dollar amount of work performed under this agreement and how much balance is left on the retainer. These simple and effective project management features will keep you on the pulse of the project. Use this information to avoid going over budget, keep your clients informed, and determine if and when it is necessary to renew the retainer agreement.
Step 6: Create reports for the client

The project dashboard is great for getting taking in a high level overview of the project. Your client is going to want more than just a dollar value of how their money is being spent. The reports section is great for giving clients detailed updates of what work has been completed and how much time it took. The Project Activity report is, perhaps, the best report for giving your client a task-by-task report. To generate this report, just click on the Project Activity report link on the project dashboard page. The resulting report will show a summary of work grouped by hourly rate, and a breakdown of time tracked and billed against each task. From here the report can be emailed to the client, saved as a PDF, printed, or saved as a CSV file.
Step 7: Renew the retainer agreement
Once the balance of the retainer agreement is at zero, it’s time to revisit the contract. If you and your client want to renew the contract with the same hourly rates, request another payment from them and go back to step 2. The balance will be credited with the new payment and you may continue working with the client, task by task, as you were before.
Should you or the client want to negotiate a new hourly rate, you will need a new contract that reflects these updates. To accommodate a new contract you will need to go back to step 1 and create a new project. This is necessary to preserve the hourly rates and reports from the previous project and its retainer agreement.
By now you’ve worked out most of the kinks that may have appeared while working under a retainer. Learn from them and apply them on the next time around with this client. Soon, working under retainer agreements with your clients will become second nature. You will grow to love the regularity in cash flow, the consistency and familiarity of repeat client work, and other great benefits of an ongoing relationship with your best clients. I know we did.
Any questions?
This guideline is based on the workflow we used for over ten years at Pelago to work on web design retainer agreements with our clients. It worked out great for us and our clients, it may just be a rough outline for you to get started. Go for it. And leave any questions, comments, criticisms and the like, in the comments.


This is close to what we are looking for in our agency. The difference is that with our retainers, we are not tracking time, rather we provide a flat monthly rate to clients, for a fee which would then be deducted from a pre-paid amount with us. This deduction occurs for every month they chose to request for updates, until the pre-paid amount is exhausted.
Can your software handle this scenario?
Max,
Yes, Intervals can hand this scenario. The retainer would be handled by adding a payment. To deduct the amount used per month, you would add an expense to the project each month the client chose to request for updates. The project dashboard will show how much balance is left, as it will calculate the different between the amount the client paid and the amount of expenses you have added.